One of the great things about homebrewing is that there’s very little special equipment needed to get started. Apart from a fermenting bucket, airlock and no-rinse sanitiser, you can mostly get by with equipment that you already have in the kitchen.
Most beginner homebrewers start by purchasing a homebrew kit which includes all the essential equipment plus the ingredients to make their first batch of beer. However, although beginners kits are a good point of entry to the hobby, most homebrewers will want to purchase additional equipment.
In this post, we take a look at eleven items a brewer can’t live without but which aren’t included in most homebrew kits.
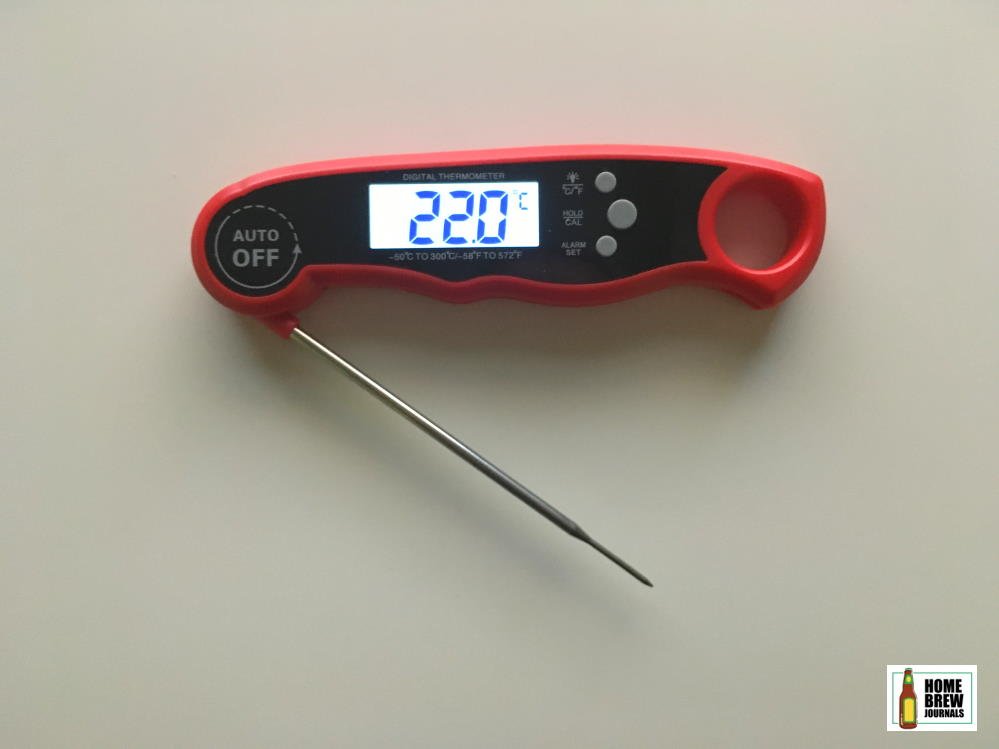
1. Electronic thermometer
After sanitation, the next most important factor in home brewing is temperature control. To this end, most homebrewers can’t live without at least one good quality thermometer.
Most homebrew kits include a glass thermometer which is used to measure the temperature of the strike water, the mash and the wort before pitching the yeast.
Although glass thermometers are perfectly adequate for these purposes, they do take a few seconds to get up to temperature. This is especially critical during the mashing stage when you will have to open the mash tun to take a temperature reading.
An electronic thermometer like this one gives an accurate temperature reading almost instantly. It also has a second sensor that you can leave in the mash tun throughout the mashing process. This allows you to monitor the temperature throughout the mashing process without having to remove the lid. This is a big advantage because opening the lid to check the temperature invariably lets some of the heat out.
2. Auto siphon
Another piece of equipment which I wish that I’d purchased sooner is an auto-siphon.
Like most novice homebrewers, I started off fermenting in a food-grade plastic bucket and bottled directly from the bucket’s built-in spigot. It wasn’t until I upgraded to using a glass carboy that I needed to start siphoning beer and purchased an auto-siphon.
Although you can siphon beer using a piece of food-grade PVC or silicon tube. An auto-siphon has the advantage that you don’t have to suck on the end of the tube to start the siphon, thus eliminating the risk of contaminating your beer with bacteria.
The advantage of using a siphon for bottling, instead of the spigot, is that you can fill the bottles from the bottom upwards, reducing the chance of your beer becoming oxidised due to contact with the air.
Although slower, I find that bottling with a siphon is far more controlled than bottling from the tap.
3. Temperature controller
I already mentioned the importance of temperature control when brewing. Another part of the process where temperature plays a crucial role is during fermentation.
Most ale yeasts work best between 18 and 22ºC (64 to 22 Fahrenheit). Outside of this temperature range, they may produce unusual funky flavours, work more slowly or even stop working altogether.
Depending on where you live, if you’re lucky enough to live in a house with a basement, you may be able to keep your fermenter at this temperature all year round.
On the other hand, if like me you live in an apartment in a country with a warm climate, you might find that you can only homebrew from October through to March. Conversely, people who live in colder parts of the world and brew in the garage might discover that they can’t brew during the winter.
The easiest way to remedy this is to keep your fermenter in a temperature-controlled fermentation chamber. This is also needed at any time of year when brewing lagers and for some styles of ales such as NEIPAs where accurate temperature control is crucial.
Most homebrewers use an old refrigerator which they convert into a fermentation chamber by removing the shelves and adding an external temperature controller like the Inkbird ITC 308 and a suitable heater.
For brewing ales, you then just need to turn the refrigerator to its coldest setting and plug it into the cooling socket of the temperature controller. You then plug the heater into the other socket.
Now, when the temperature rises above the setpoint, the refrigerator turns on and starts cooling. Conversely, if the temperature drops below the setpoint, the fridge is switched off, and the heater element is turned on.
If you will be brewing lagers, and for cold crashing, you may also need to override the refrigerator’s built-in thermostat. More information in this article.
4. Refractometer
Once you’ve got your first few batches of beer under your belt, it’s time to start shooting for consistency.
Most homebrew recipes will include the expected OG and FG readings, but many brewers also take gravity readings after lautering and again towards the end of the boil. This allows you to tweak the sugar content of the wort if necessary by either adding more water, adding malt extract or boiling for longer.
Although some kits include a hydrometer, these do have some limitations.
Firstly, each time you take a measurement with a hydrometer, you remove 200 millilitres (7 fluid ounces) of liquid. This may not be too significant if you are brewing a five-gallon batch, but when you brew smaller batches, then it’s almost a whole bottle of beer.
The other drawback is that hydrometers only work within a limited temperature range. Even if you correct for temperature using this handy calculator, you can’t use a hydrometer to measure the gravity of boiling wort.
Both of these problems are easily overcome by using a refractometer like this one by ATC which is available on Amazon.
A refractometer only needs a few drops of liquid and can even be used with boiling wort.
5. Digital scale
Once you stop buying beer kit refills and start following recipes, you’ll need to be able to weigh the ingredients accurately.
A batch of craft beer will typically require several kilos (pounds) of malt, around a hundred grams of different varieties of hops and perhaps a few grams of Irish moss.
A digital scale like this one can accurately measure from a few grams up to five kilos.
6. Bottle tree
The next item on the list isn’t needed if you have a keg system but, since the majority of homebrewers bottle their beer, a bottle tree is an essential piece of kit for most brewers.
If you are brewing larger batches, then a bottle tree will save space and hold the bottles safely with no risk of falling over as they dry.
I usually wash out all my bottles the day before I will be bottling my beer and then leave them on the bottle tree overnight to dry. Then, about half an hour before bottling, I sanitise the bottles and spray the bottle tree with sanitiser before placing the bottles on it to drain.
7. Wort chiller
Possibly the most essential item on this list, and one which most brewers can’t live without, is the wort chiller. Once the wort has boiled for the amount of time recommended in the recipe (usually an hour), it needs to be cooled down as quickly as possible.
New brewers usually cool the wort down by immersing the boil kettle in cold water. Although this does cool the wort faster than just letting it cool down naturally, it’s still a slow process.
Allowing the wort to cool slowly increases the risk of infection and off flavours, adds bitterness and may make the beer cloudy. A wort chiller can cool the wort to pitching temperature in just a few minutes.
There are three types of wort chiller; immersion chillers, counter-flow chillers and plate chillers.
An immersion chiller is a coiled metal tube (either stainless steel or copper) through which cold water flows. The chiller is connected to a cold water tap and then immersed in the wort. Water running through the metal coil cools the wort. The cooling efficiency can be increased by stirring the wort.
A counter-flow chiller is similar to the immersion chiller except that, instead of being immersed in the wort, it is made of two concentric tubes. The hot wort is pumped through the inner tube while cold water passes through the outer tube in the opposite direction. A plate chiller is similar to a counter-flow chiller except that instead of being made up of coiled tubes, it is rectangular, similar to the intercoolers used in vehicles or for industrial cooling applications.
The advantage of the immersion chiller is that it is easy to clean and cools down the entire batch at the same time. The advantage of counter-flow and plate chillers is that they are more efficient and can cool the wort down to the required temperature more quickly.
If you’re thinking of purchasing an immersion wort chiller, this one by Northern Brewer would be a good choice.
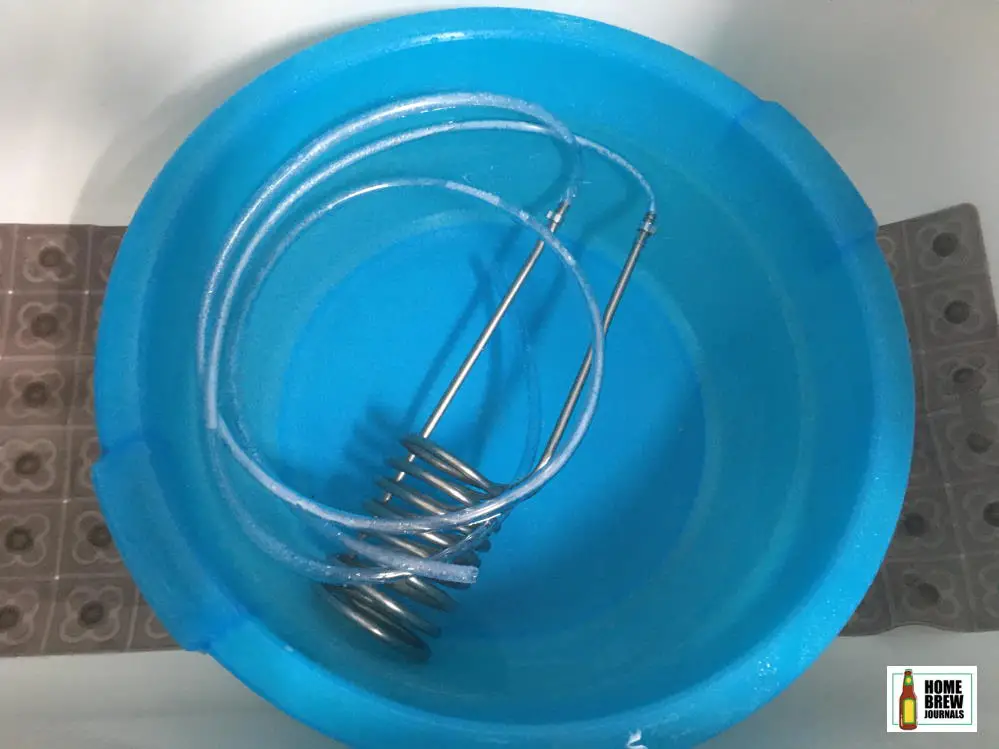
8. Oxygenation system
Oxidation spoils the flavour of beer and makes it taste stale. Because of this, brewers go to great lengths to stop the beer from coming into contact with oxygen during the fermentation and conditioning process, right up to when the beer is served.
The only time that you want to add oxygen to the wort is just before pitching the yeast. Oxygenating the wort at this stage helps the yeast multiply and start creating alcohol as soon as possible. By getting the yeast off to a good start, you also ensure that it will overcome any unwanted bacteria that may have found its way into the brew.
Most new brewers aerate their wort by vigorously shaking or stirring the wort in the fermenter for about ten minutes. Shaking the fermenter may be OK for a small five litre (one gallon) carboy but, unless you’re built like the Incredible Hulk, it’s not practical for larger batches.
Stirring with a large spoon or mash paddle is an OK solution if you’re using a bucket type fermenter, although you do have to be careful not to scratch the plastic or contaminate the wort.
For glass carboys and conical fermenters, the best way to oxygenate the wort is by using a small pump, similar to an aquarium pump, fitted with a HEPA filter to remove bacteria and other nasties from the air. This is connected to a plastic tube with a stainless steel aeration stone that creates tiny bubbles which are easily absorbed by the wort.
9. Homebrew books and manuals
Homebrewing can be as straightforward or as complicated as you like and it is possible to make a decent batch of beer by merely following the instructions which came with your kit. However, if you decide to take the hobby further, and maybe start creating your own recipes, you’ll get better results if you understand at least some of the theory behind brewing.
Even though there’s plenty of information available online, I still think it’s a good idea to purchase a book or two. In addition to being a more reliable and verified source of information, books are generally organised into chapters which guide you step by step through the entire brewing process.
For new brewers, I highly recommend Brew by James Morten which guides the reader step by step through the entire brewing process. The author shares some of his own recipes and explains the Boil In A Bag method in detail.
Even if you decide not to brew in the same way that James does, the book explains the basics of brewing very well without overwhelming the reader with too much jargon. There’s also an excellent troubleshooting section.
Another book which I like is Craft Brew by Euan Ferguson. This book contains a collection of recipes that will help you replicate some of the world’s most popular craft beers. Not only is it a great way to start brewing different styles of beer, but clone recipes also help you improve your home brewing technique by comparing your beer side by side with the original.
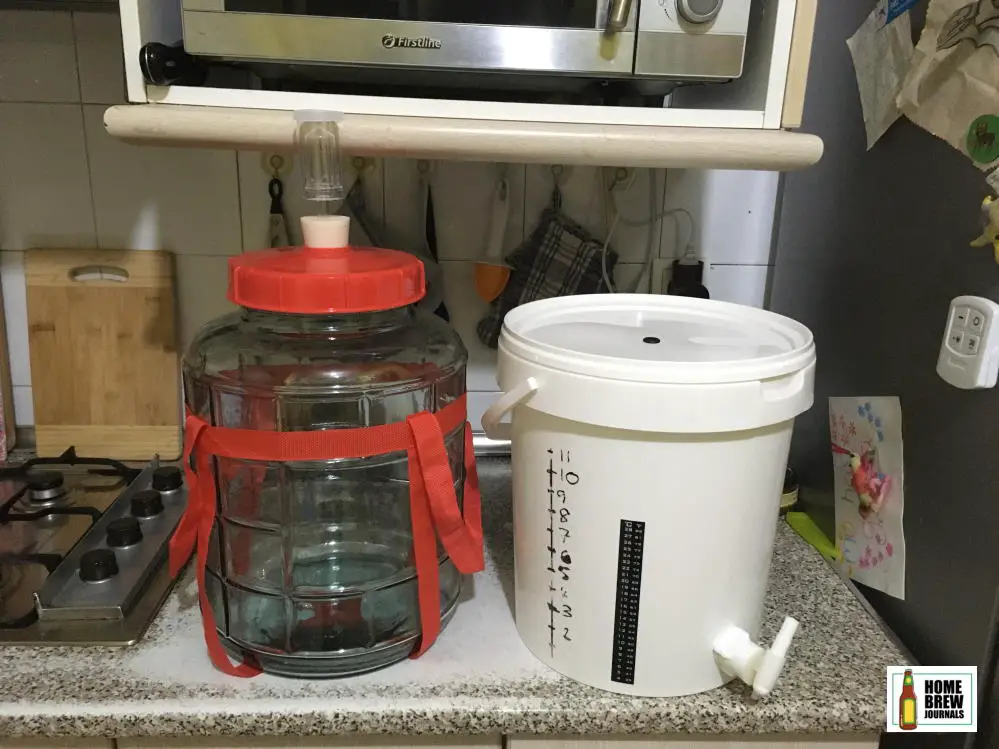
10. Glass fermenter
The main disadvantage of plastic fermenters is that they are porous and easy to scratch. No matter how thoroughly you clean them, once they have been used a few times, plastic fermenters start to smell of beer. This may not be a problem in itself, but if you get overzealous when cleaning them, they can get scratched, potentially harbouring bacteria that could ruin your beer.
Also, I’m not too fond of the fact that the lids of plastic buckets don’t always seal as well as they should. Although this isn’t really a problem, if the CO2 generated during fermentation doesn’t bubble through the airlock, then there’s no way to see how things are progressing without removing the lid.
The main advantage of plastic fermenters is the large lid which makes transferring the wort, cleaning and dry hopping easier than it would be with a traditional glass carboy. This is where wide-mouthed glass fermenters like Brewferm’s Royal Bubbler come into play by combining all the advantages of traditional glass fermenters, with the easy access of buckets.
I recently upgraded to a glass fermenter from a plastic bucket and wish that I’d done so sooner.
11. Spray bottle of sanitiser
The easiest way of spoiling an entire batch of beer is through poor sanitation. Once you’ve finished boiling the wort, everything which comes into contact with your beer needs to be clean and sanitised.
I normally mix up ten litres of sanitiser in my fermenter, swill it around and let it sit for about ten minutes before pouring it out into a large plastic bowl where I sanitise all my other equipment.
I also keep a plastic spray bottle of sanitiser handy to give things a quick spray whenever needed. It comes in really handy for spraying work surfaces, bottle caps, scissors and anything which might inadvertently come into contact with something that it shouldn’t.
